From the selection and installation of the greenhouse on the site depends on the rate of maturation of the grown products. Gardeners should pay attention to the Treshka greenhouse construction, which is produced by the Volia company (Dubna, Russia). The building has a large, roomy room, and also does not require pouring the foundation for installation. What is included in the package of the greenhouse, its installation are described in the article below.
Technical characteristics and equipment of the greenhouse
The greenhouse of the Dachnaya-Treshka model, 3 × 6 m in size, entered the market in 2013 and took a leading position in sales. The design has standard parameters: height - 2.1 m and width - 3 m. You can choose a suitable length of the greenhouse - from 4 to 8 m.
Did you know? The inhabitants of the northern countries, attach greenhouses to their home - this reduces the time required to care for crops and serves as an additional heating of the home space.
Greenhouse Options:
- fixing materials;
- frame;
- seals on the door, windows, end parts;
- doorway;
- 2 window leaves;
- racks for soil installation.
The consumer can initially purchase a reinforced greenhouse from the Volia company ready for installation, as well as, it is possible, the purchase of individual parts of the structure.
Thus, if the gardener has polycarbonate sheets available, then you can purchase a frame, and mount the casing yourself. For the construction of a structure with dimensions of 3 × 6 m, 4 sheets of polycarbonate 2.1 × 6 m in size will be required.

Ready-made polycarbonate structures are presented in three versions:
- "Country" - has a small profile thickness, which reduces the service life to 4 years (maximum);
- "Standard" - the average thickness of the material, which implies a 10-year product life;
- Premium - differs in the increased durability of sheets and a profile that increases term of operation up to 15 years.
Did you know? Greenhouse premises in Iceland are located on hot geysers.
Benefits
- Among the positive qualities of the three-piece greenhouse design are:
- compact packaging;
- ease of use of the finished structure;
- a sufficient amount of “useful” premises;
- the ability to install the frame without a fundamental basis;
- the presence of window panes, which will allow ventilating the room;
- resistance to corrosion of materials.

Disadvantages
During the operation of the greenhouse, it is possible to highlight the disadvantages that are associated with the fragility of the structure. With a heavy load associated with the action of physical factors, such as strong winds, heavy snow, the structure may not withstand and bend or break.
During installation, the latches and awnings on the windows and doors should be replaced, because the attached fasteners are too weak. A significant disadvantage is the difficulty of assembling the greenhouse structure - it may take several days for installation work.
Build Features
In the process, difficulties may arise due to the fragility of the frame, so when assembling it will not be superfluous to take care of additional supports at the time of installation. Additional holes for fastening should not be made in the arcs for the frame, because such actions can damage the integrity of the product and lead to its breakdown. Installation of window leaves is carried out at the end of the assembly.
How to collect a greenhouse "Three rubles" manufacturer "Will"
Assemble the construction must be strictly according to the instructions attached to the purchase of goods. When working with a metal profile, it is better to wear protective gloves and a work uniform to prevent injuries during installation.


Necessary tools
All parts are fastened with nuts and bolts, so you need a wrench to securely fix the mounting hardware. To cut polycarbonate sheets you need an electric jigsaw or hacksaw.
Step-by-step assembly instructions
First of all, you need to assemble the frame, the details for which are marked with numbers. Numbering greatly facilitates the work process, because the installer only needs to connect all the parts together.
Important! All parts of the frame installation are connected «profile to profile».
Frame Assembly Instructions:
- Connect power arcs marked as: 4VK and 4V.

- Attach and tightly fasten the runs marked with 2B to the arcs on both sides.
- From the bottom, attach the 4H and 4NK arcs.
- Screw runs with numbering 2 to the lower arcs on the right and left.
- Racks marked 1 and supports 3 are attached to the lower arches, they are connected by runs with numbering - 2.

- Next, the installation of the end parts of the frame, marked with numbers: 8, 10, 11-L, 11-P, 9-1, 9-2L, 9-2P.
- The internal struts are assembled from parts 18 and 19. Then they are fixed inside the frame base to each arc using a tie 17 and the strut 20. The fastening is done so that one end of the strut is at the junction of the parts 18 and 19, and the second on the arc 4H.
- Side braces and couplers at number 17 are connected by a stiffness cut, which is marked by number 21.
- Next, tubular door amplifiers are attached.

- Installation of end brackets for fastening polycarbonate - 4 pcs on each side.

- Of the details: 12, 13, 14, 15, 16, a separate assembly of the window and door is carried out.


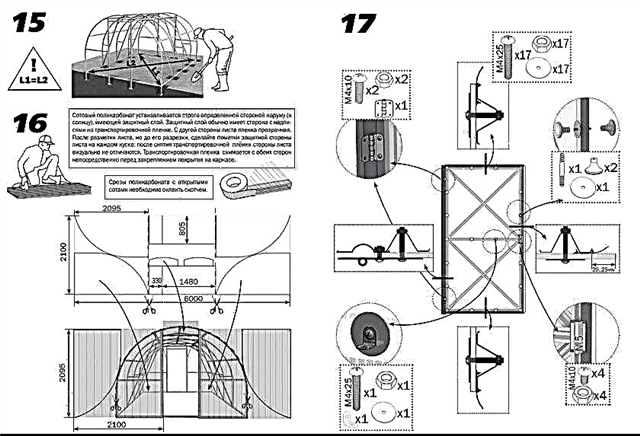

- After collecting the frame, you can proceed to its lining. Each section of the polycarbonate web is fastened with self-tapping screws, clamps and washers. When fastening the casing, it is important to control the degree of tightening, because the material is fragile and can wrinkle.
 Fastening polycarbonate to a metal frame
Casing:

Video: assembly and installation of the greenhouse "Country-Treshka"
When choosing a greenhouse, you need to evaluate not only its external data and capacity, but also pay attention to the materials from which the structure is assembled - they must be environmentally friendly and durable. Due to the fact that the metal of which the structure is made is not susceptible to corrosion, the greenhouse can be used in regions with a humid climate without fear for its safety.


